
Mother’s Day Crafts for Kids: DIY Photo Flowers With Free Printable Template
Mom will cherish these adorable homemade blooms with her children's faces in them.
Mar 26, 2022
Move over macaroni frames, there’s a new DIY Mother’s Day craft in town! And it’s not only fun to make but easy, too.
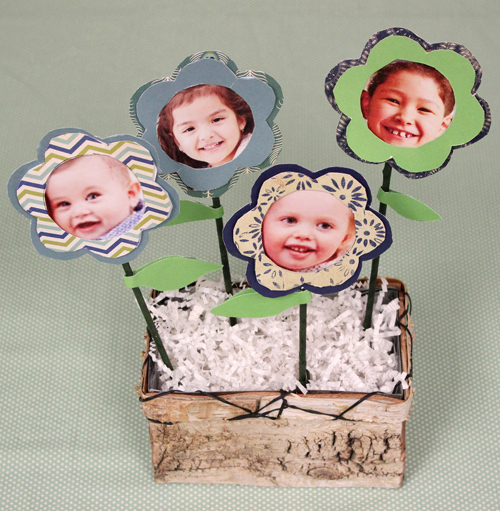
Using our photo flower stencil template, some scrapbooking paper, scissors, and a bit of glue, we created creative and colorful DIY photo flowers. They're the perfect kid-friendly complement to those stunning Mother’s Day flowers you plan on getting Mom.
Let the kids get creative by picking out their own patterned paper and colors. They’ll love letting their personalities shine in this personalized Mother’s Day gift idea.
And Mom will think it's just the sweetest present she's ever received.
Supplies for DIY photo flowers
- Photo flower template (download here)
- Scrapbook and construction paper in various colors and patterns
- Scissors
- Glue
- Floral tape
- Tape
- Lollipop sticks or similar
- Photos
Directions for DIY photo flowers

Load your printer with a sheet of cardstock; download and print the photo flower stencil template. Cut out the shapes to use as stencils. Set aside.

Now, prepare the photograph. If are using an existing photo, trace the smaller flower on the photograph and cut out the shape. If you plan on printing your child’s photo, crop the area you wish to use to 3.5 inches by 3.5 inches. Print on high-quality photo paper for best results. Once printed, use the smaller flower to trace the shape and cut out the photo.

Take the larger flower and trace it onto the color/pattern you’d like to appear on the outermost layer of the flower. Cut out and set aside.
Then, take the smaller flower and trace it onto the color/patterned paper you would on the middle layer of the flower. Trace the circle stencil in the middle of the smaller flower shape. Fold in half and cut out the circle shape from the flower to create an open space.

Once you have all the shapes cut out, place a few drops of glue onto the largest flower. Take your first photo and glue it down. Once it's dry, add a few drops of glue to the smaller flower and place it on top of the photo.

To make the stems, grab your stick and wrap it in floral tape. (The tape is naturally slightly sticky so no further glue is necessary.) Once fully wrapped, tape the stick to the back of the flower.

Optional: Fold a piece of green construction paper in half and cut out a folded leaf shape. Add glue to one half of the leaf and hug it around the newly created stem.
AUTHOR

Celebrate every occasion and holiday with Michelle Yastremsky! Join her as she comes up with creative ways to make your holiday party stand out!


